User Guide
Getting Started
Welcome to GF Utility! This guide covers all 12 utilities included in the plugin, with detailed instructions, screenshots, and video tutorials to help you get the most out of each feature.
If you haven't installed GF Utility yet, please view the Installation Guide first. Once the plugin is activated, all utilities become available in your Gravity Forms admin area automatically. Don't need one? Switch it off in the GF Utility settings.
Each utility below includes step-by-step usage instructions. Use the table of contents below to jump to a specific utility.
All 12 utilities included · 30-day money-back guarantee
Utility Index
- Create Page for Form — Add a form to a new page in one click
- Show Page on Form List — See where each form is embedded
- Toggle All Fields Required — One-click required/optional toggle
- Redact Sensitive Data — Protect sensitive entry data
- Send Notification on Entry Update — Get notified on entry changes
- Manually Process Feeds — Trigger feeds for existing entries
- Hide Form from User Once Submitted — Prevent duplicate submissions
- Prevent Entry Creation — Stop entries from being saved
- Show Feeds Connected to a Form — View connected feeds in forms list
- Process Feed When Entry Updated — Trigger feeds on entry updates
- Admin Bar "Edit Forms" Menu — Edit a form straight from the page it's on
- Record Sent Notifications — See which notifications were sent, and to whom
Switching utilities on and off — Choose which utilities you use
1. Create Page for Form
Add a Gravity Form to a new WordPress page in one click, straight from the forms list.
You've built a form in Gravity Forms, and now it needs a page: create a page, give it a title, add the Gravity Forms block, pick the form. Create Page for Form does all of that for you. Each form in the forms list gets a Create Page action that creates a page titled after the form, with the form already on it, and opens it in the editor.
The page is created as a draft, so nothing goes live until you publish it. Once it's published, the page shows up in the Page column of the forms list and in the Utility menu of the form editor (see Show Page on Form List).
The action is shown to users who can publish pages and edit forms. Forms in the trash don't have it.
Where to find it: In the Forms → Forms list, in the actions under each form's title.
How to use:
- Go to Forms → Forms in your WordPress admin menu.
- Hover over a form and click Create Page.
- The new draft page opens in the editor, with the form on it. Add any other content you like.
- Click Publish when you're ready.
Configuration options: None required. Works automatically.
2. Show Page (on Form List)
See which pages contain each form directly in the forms list. Click to edit or view the page instantly. No more guessing where forms are embedded!
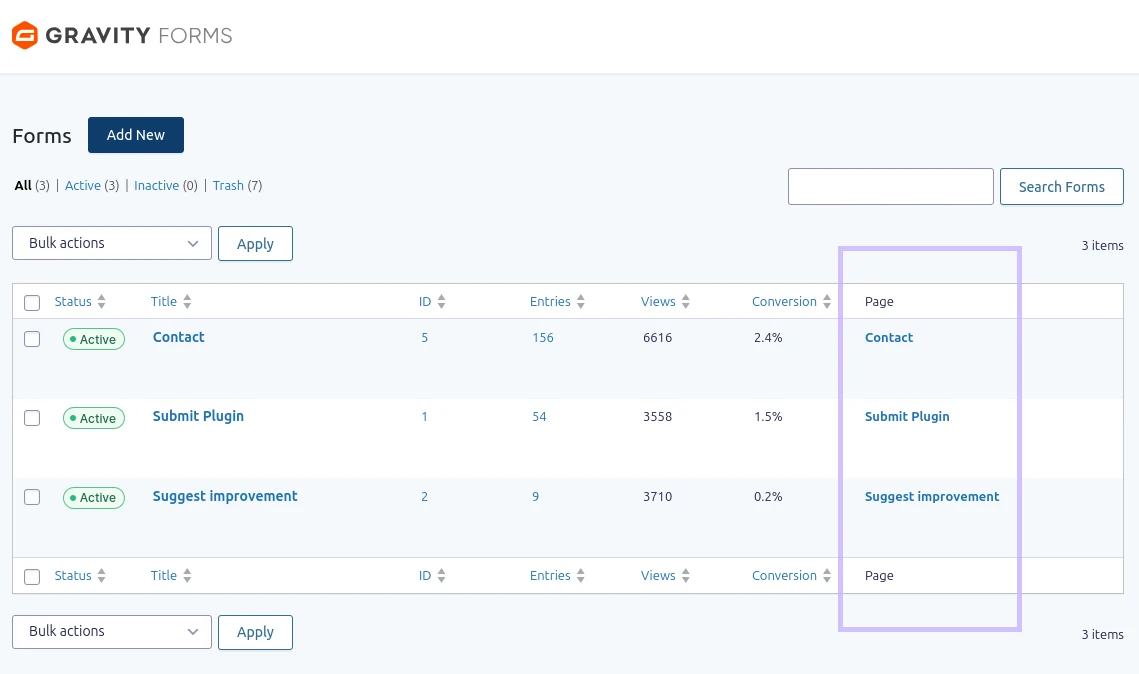
The Show Page on Form List utility adds a new column to the Gravity Forms form list that displays the pages where each form is embedded. Instead of clicking through each form or using shortcode search, you can see at a glance which posts, pages, or custom post types contain a form. Click the page name to edit it, or open it on the frontend to see the form in action.
Only published pages, and private pages you're allowed to read, are listed: drafts, pending and scheduled posts are not. If you can't edit a page, its name links to the page itself, without an Edit link.
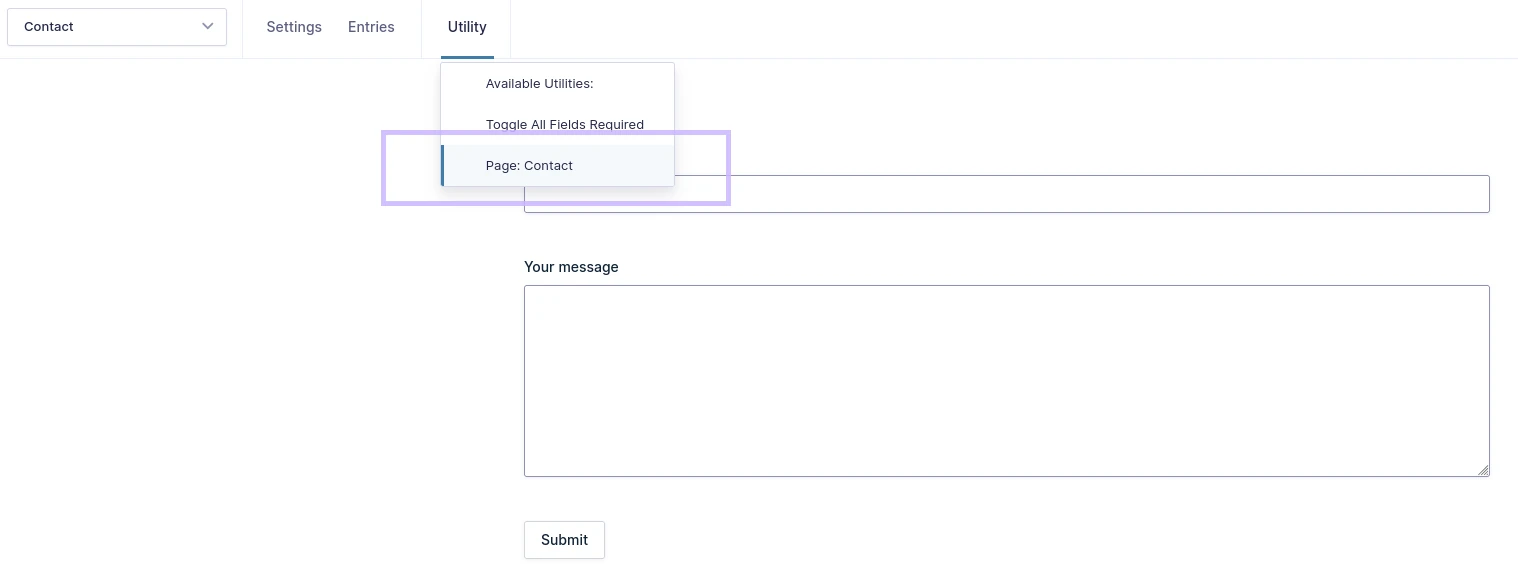
Where to find it: In the Forms → Forms list page, each form row shows a new column with linked page names. Pages are also listed in the Utility menu when editing a form (see screenshot below).
How to use:
- Go to Forms → Forms in your WordPress admin menu.
- Look at the "Page" column next to each form to see where it's embedded.
- Click a page name to edit it or view it on the frontend.
Alternatively:
- Edit a form.
- Hover over "Utility" in the form menu.
- Click the page name to view it on the frontend.
Configuration options: None required. Works automatically.
3. Toggle All Fields Required
With one click, make all fields required or optional. Perfect for testing and rapid form prototyping. Massive time-saver for complex forms.
Setting individual field required status in Gravity Forms normally requires clicking each field and toggling its "Required" checkbox. With dozens or hundreds of fields, this is tedious and error-prone. Toggle All Fields Required adds a toolbar button that lets you make all fields required or optional with a single click — ideal for testing form validation, creating quick prototypes, or bulk-updating form field properties.
Where to find it: In the Gravity Forms form editor, a "Toggle Required" option appears under "Utility" in the editor toolbar.
How to use:
- Open any form in the Gravity Forms form editor.
- Hover over "Utility" in the editor toolbar.
- Click the "Toggle Required" button.
- A modal appears stating the change (required vs optional) made.
- Close the modal and save the form to apply the changes.
Configuration options: None required.
4. Redact Sensitive Data
Keep sensitive information (like passwords or ID numbers) out of your entries, while it's still available to the notifications of that submission. GDPR-friendly utility.
When collecting sensitive data - passwords, personal identification numbers - you often need the data while the form is being submitted (for example in a notification email), but don't want it stored in WordPress. The Redact utility lets you mark a field so its value is never saved: not in the entry, and not in a Save and Continue draft either (someone who resumes a draft fills in the field again). Redacted values can't be recovered.
The value is only available while that submission is being processed: in its notifications and in the feeds that run during the submission. Feeds that run later, such as Manually Process Feeds, Process Feed When Entry Updated, or delayed or background feed processing, don't get the value.
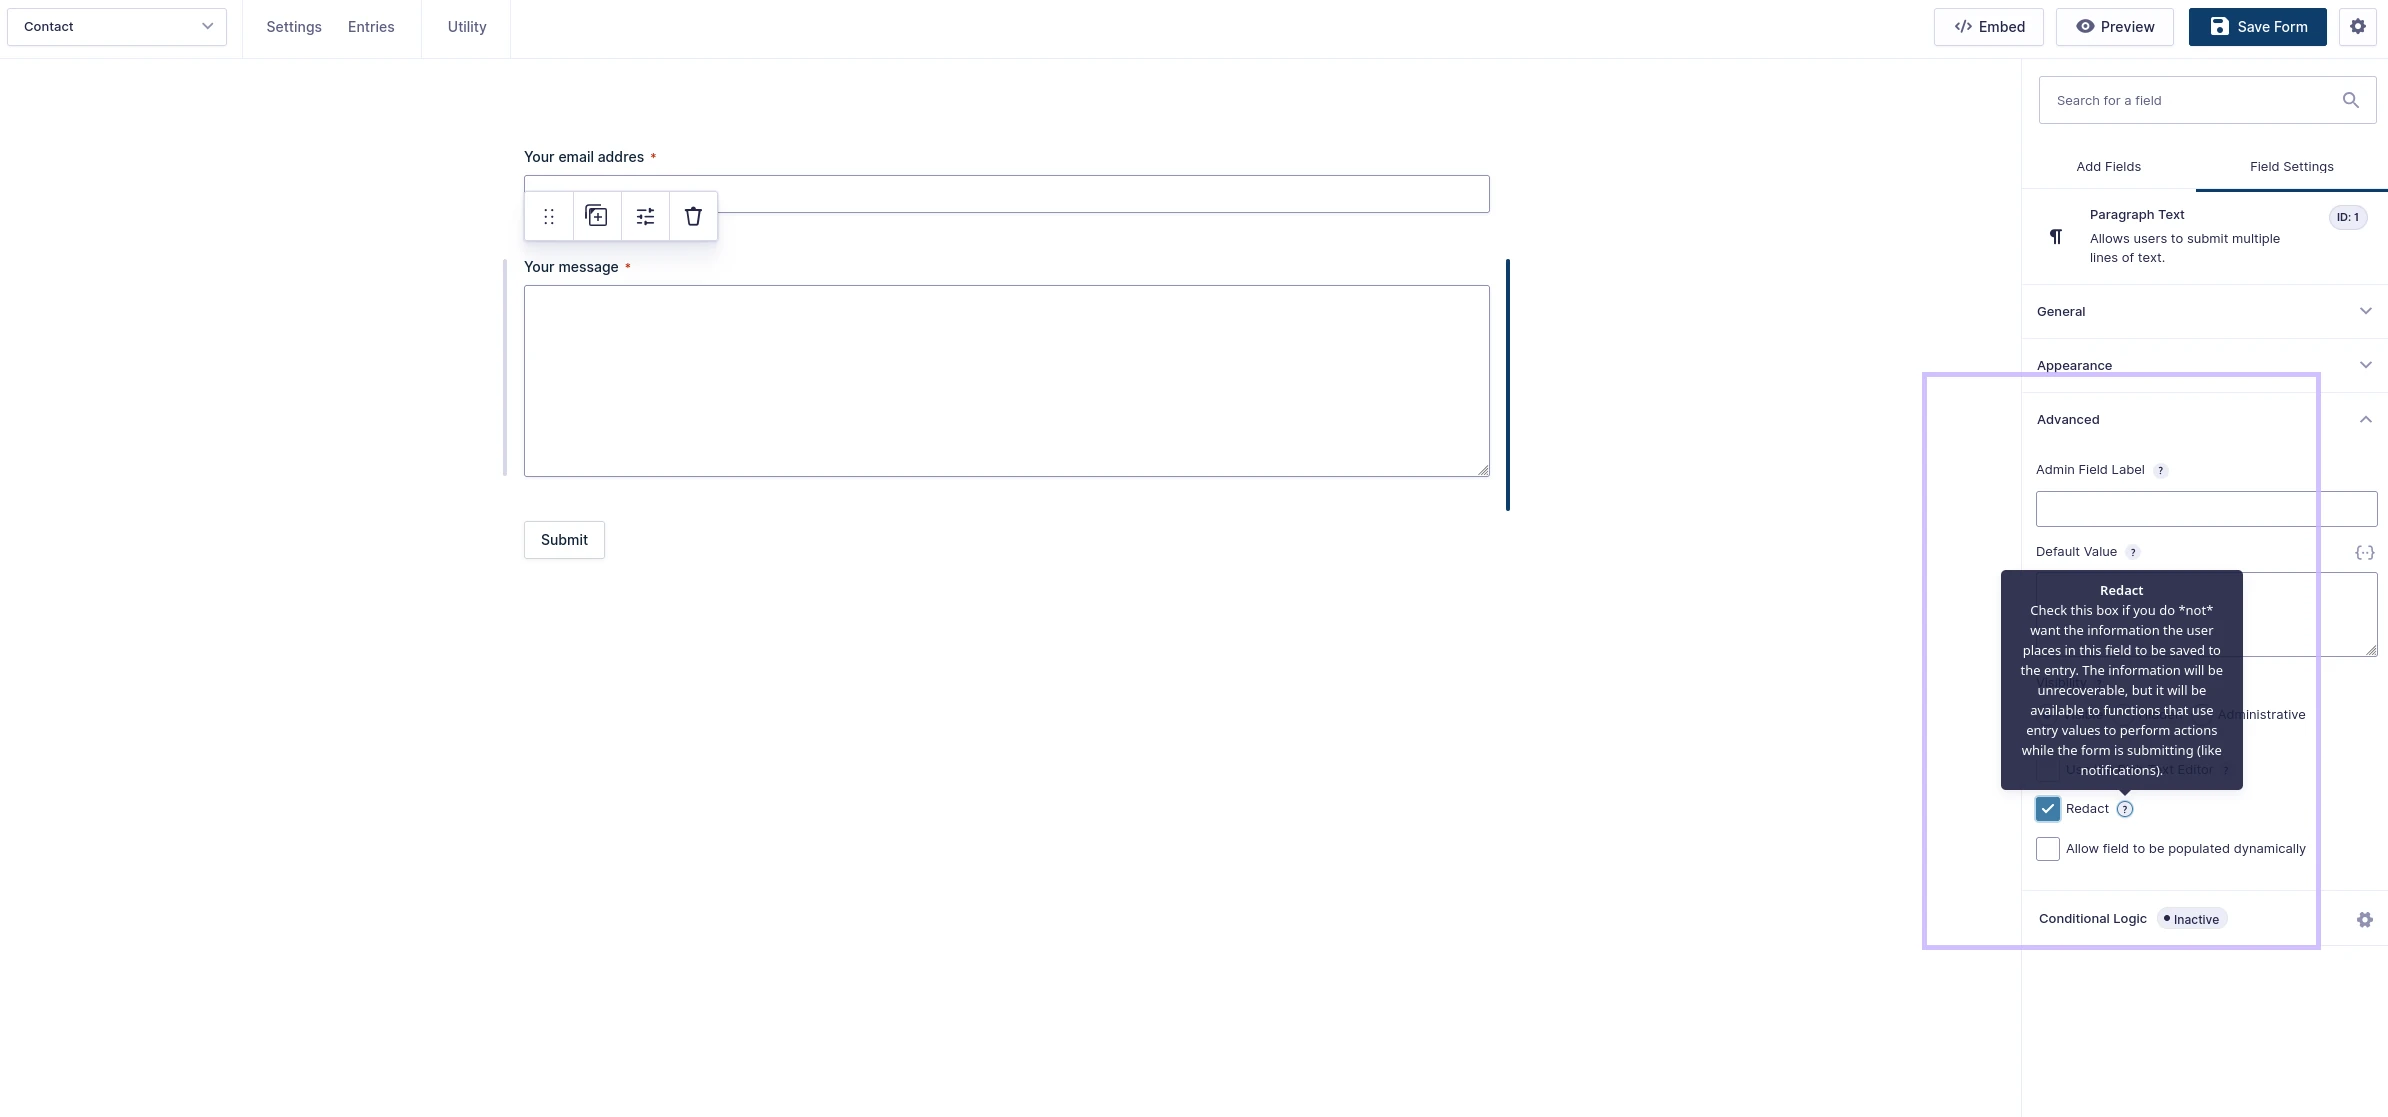
Where to find it: While editing a form: Field Settings → Advanced → Redact.
How to use:
- Edit a form.
- Select any field in the form.
- Open the "Advanced" section from "Field Settings" sidebar tab.
- Tick the "Redact" checkbox and save the form.
- Redacted data is never stored, but is still available to the notifications sent for that submission.
5. Send Notification on Entry Update
Adds an "Entry is updated" notification event. Get notified when users update their entries. Stay on top. Keep track of changes.
Gravity Forms supports notifications on form submission, but what if you allow users to edit their entries? Without this utility, you won't know when an entry is modified. Send Notification on Entry Update adds a new notification event type — "Entry is updated" — that lets you configure email notifications to fire whenever an existing entry is modified. This ensures you're always aware of changes to important submissions.
It works when an entry is updated in the admin, on the front end with GravityView, or through the API. Every entry updated in one request gets its notifications, for example GP Nested Forms parent and child entries updated together by a payment callback.
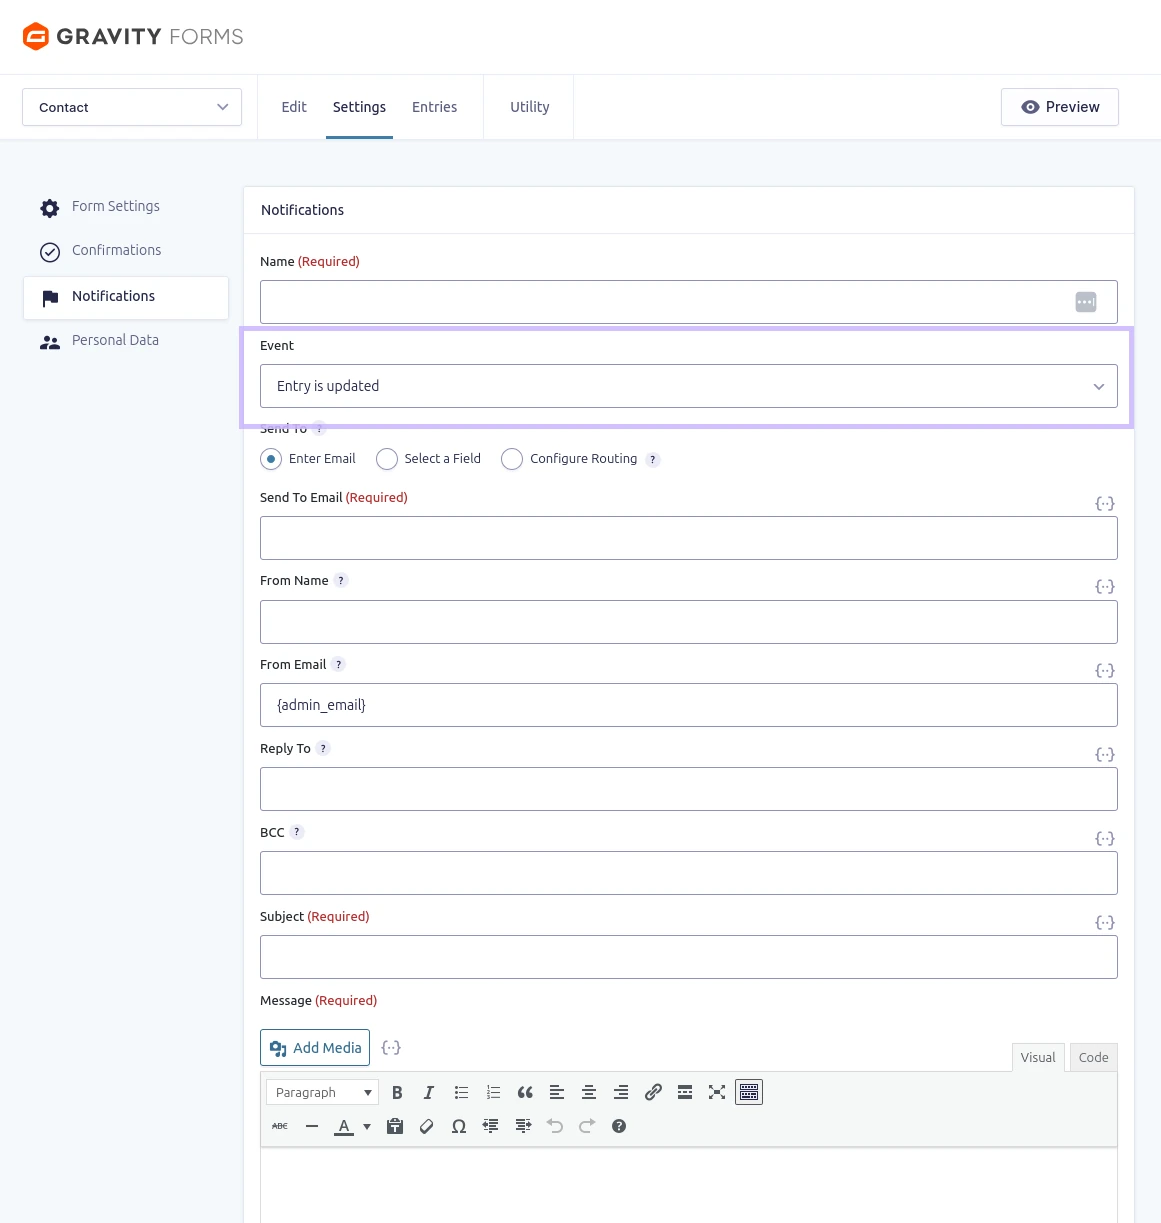
Where to find it: In the form's Settings → Notifications area, a new event type "Entry is updated" appears.
How to use:
- Open a form, go to Settings → Notifications.
- Create a new notification or edit an existing one.
- Set the event to "Entry is updated".
- Configure email recipients, subject, and message as usual.
Configuration options: Standard Gravity Forms notification settings (recipients, subject, message, formatting).
6. Manually Process Feeds
Trigger Gravity Forms add-on feeds (like Mailchimp or a CRM) manually for existing entries. Fix missed connections easily. Life-saver when automations fail.
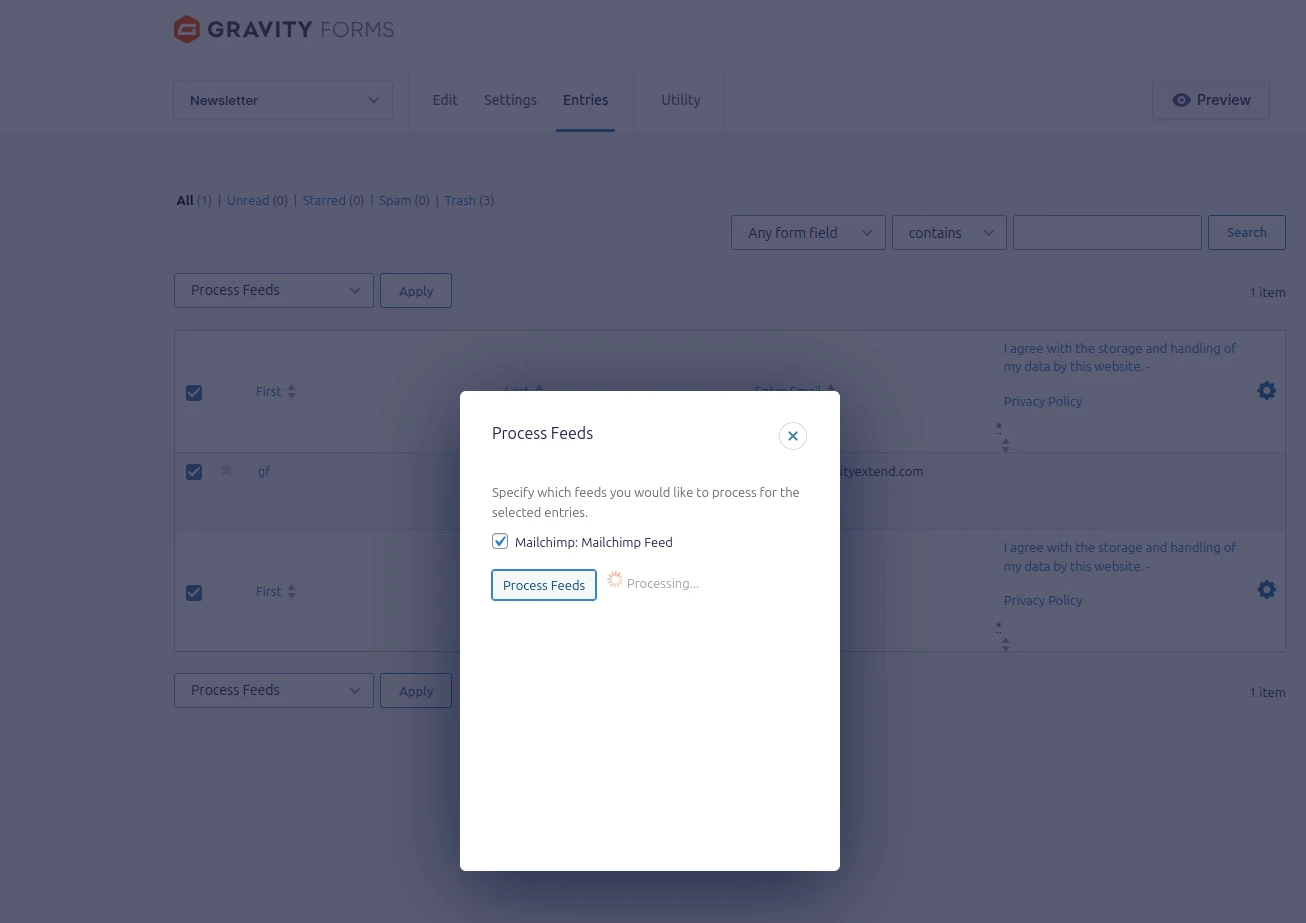
Sometimes automated feed processing fails — maybe an API was down, a configuration was wrong, or the entry was created before the feed was set up. Normally, you'd need to delete the entry and resubmit, which is impractical for real data. The Manually Process Feeds utility lets you trigger any add-on feed for existing entries on demand. Select the entries, choose which feeds to process, and the utility runs them for those entries. Only active feeds of the form are processed; payment add-ons (like PayPal or Stripe) can't be processed this way.
Where to find it: In the entry list (Forms → Entries), a "Process Feeds" option appears in the "Bulk actions" dropdown. You need the Gravity Forms Edit Entries permission, as for Resend Notifications.
How to use:
- Go to Forms → Entries. Process Feeds works for the form that's shown, also when you opened Entries from the menu without selecting a form.
- Tick the entries that weren't processed by a feed. "Select all N entries" isn't supported: select the entries on the page, process them, then go to the next page.
- Select the "Process Feeds" option from the "Bulk actions" dropdown menu.
- A popup modal appears: select which feed(s) to process.
- Confirm to manually trigger the feed(s). If something goes wrong, the error is shown in the modal.
Configuration options: Select specific feeds to process.
7. Hide Form from User Once Submitted
Hide forms from users who have already submitted them, or show a custom HTML placeholder instead. Perfect for "one-time" surveys, applications, or thank-you messages. Prevent duplicate submissions or show custom content.
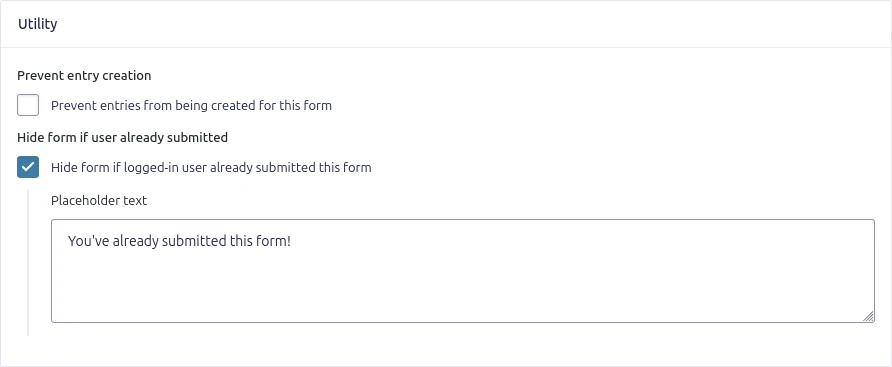
For surveys, applications, contest entries, or any one-time submission scenario, you need to prevent users from submitting the same form twice. The Hide Form from User Once Submitted utility checks if the logged-in user has already submitted the form. If they have, the form is hidden and replaced with a custom message or HTML content — like a thank-you note, a link to their submission, or instructions for next steps. It only works for logged-in users: visitors who aren't logged in always see the form.
A second submission by the same user is also refused, even from a page that was still open, an AJAX submission or the API. Without placeholder text, the user then sees "You have already submitted this form." Saving a Save and Continue draft is still possible.
Where to find it: In the form's Settings → Form Settings, in the Utility section, check "Hide form if logged-in user already submitted this form".
How to use:
- Open a form, go to Settings → Form Settings and scroll to the Utility section at the bottom.
- Check "Hide form if logged-in user already submitted this form".
- Optionally enter placeholder text or HTML content to show instead of the form.
- Users who have already submitted will see the placeholder instead of the form.
Configuration options: Custom HTML placeholder content message for when a form was submitted (and not displayed).
8. Prevent Entry Creation
Stop entries from being saved to the database for selected forms. Useful for test forms, preview modes, or forms that only send notifications without storing data. GDPR-friendly, reduces database clutter.
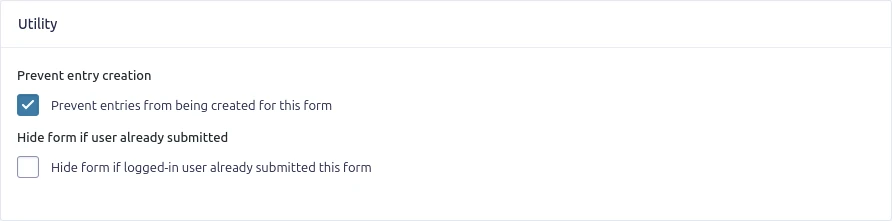
Sometimes you need a form to process data — send notifications, trigger feeds — without storing anything in the WordPress database. Test forms, preview modes, and certain GDPR-conscious workflows benefit from this approach. The Prevent Entry Creation utility adds a simple checkbox to each form's settings. When enabled, the form still functions normally: notifications are sent and feeds run during the submission. Right after that, the entry is deleted, so no entry data is kept, keeping your database lean and your compliance posture strong.
Where to find it: In the form's Settings → Form Settings, in the Utility section, check "Prevent entries from being created for this form".
How to use:
- Open a form, go to Settings → Form Settings and scroll to the Utility section.
- Check "Prevent entries from being created for this form" and save the settings.
- Notifications and feeds still run during the submission. Afterwards, the entry is deleted.
Configuration options: A per-form setting: enable it on each form whose entries shouldn't be kept.
9. Show Feeds Connected to a Form
See all connected add-on feeds (MailChimp, PayPal, etc.) directly in the forms list. Quickly identify which forms have active integrations and troubleshoot feed issues. Never wonder which feeds are connected.
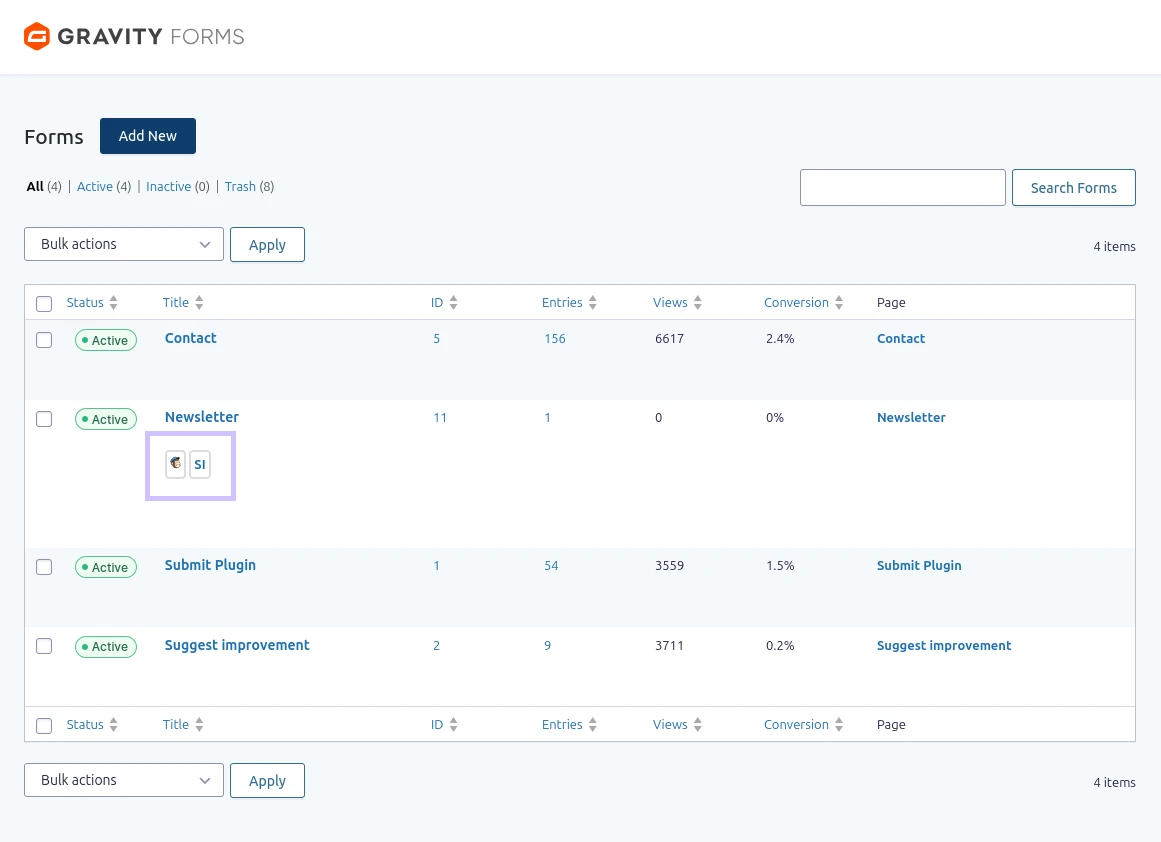
When managing multiple forms with various add-on integrations, it's easy to lose track of which forms have active feeds — MailChimp lists, PayPal payment gateways, Slack notifications, etc. The Show Feeds Connected to a Form utility shows an icon for each connected add-on right under the form's title in the Forms list. The icon is solid if the form has an active feed for that add-on, and faded if its feeds are inactive. Add-ons without their own icon show their initials. It also shows when a form is connected to GravityView, GFChart or Gravity PDF.
Where to find it: In the Forms → Forms list page, under each form's title.
How to use:
- Go to Forms → Forms in your WordPress admin menu.
- Look under each form's title to see which add-ons are connected. Hover over an icon to see the add-on's name.
- Click an icon to go to that add-on's feeds for the form (or the connected views, charts or PDFs).
Configuration options: None required. Works automatically.
10. Process Feed When Entry Updated
Trigger Gravity Forms add-on feeds when entries are updated, not just on initial submission. Keep your integrations in sync with entry changes and corrections.
By default, Gravity Forms only triggers add-on feeds when an entry is first submitted. If an entry is later edited — for example, a user corrects their email address or updates a shipping address — the connected services (like Mailchimp or your CRM) remain out of sync. The Process Feed When Entry Updated utility adds an option to reprocess specific feeds whenever an entry is modified, ensuring your integrations always reflect the latest data.
The feed runs on every update, also when it already ran for the entry on submission, and also for add-ons that process feeds in the background. It works when an entry is updated in the admin, on the front end with GravityView, or through the API. Payment add-ons (like PayPal or Stripe) don't have this option.
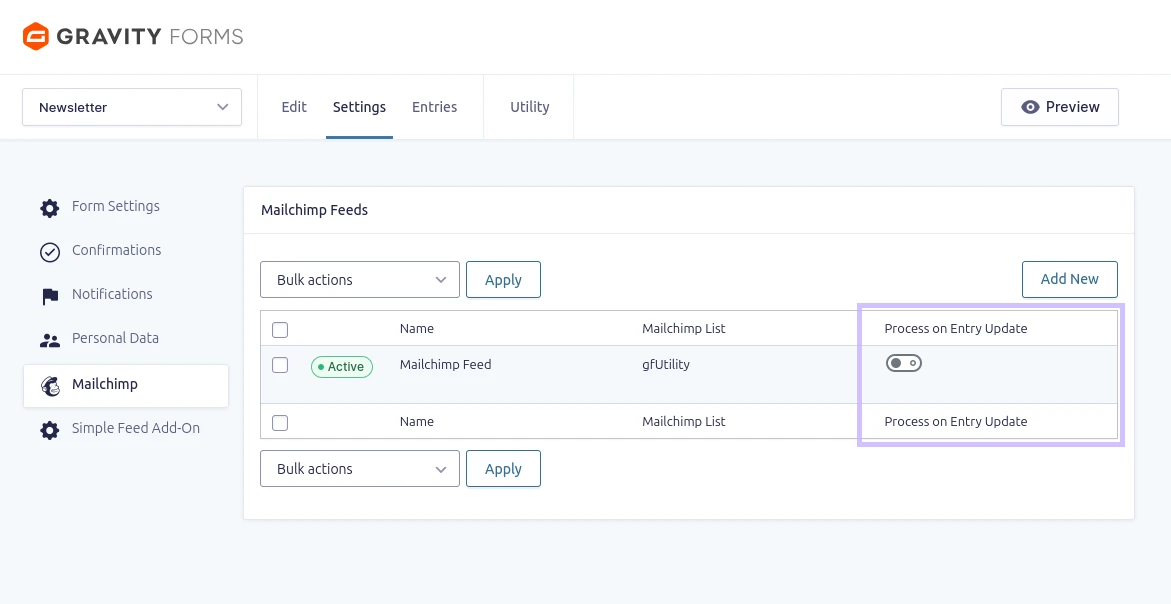
Where to find it: In the form's feeds, in the column "Process on Entry Update". To change it, you need permission to edit forms and to manage that add-on's feeds.
How to use:
- Open a form, go to Settings.
- Select the feed add-on of your choice (e.g. Mailchimp) from the left-hand settings menu.
- In the "Process on Entry Update" column, switch the toggle to Active for the appropriate feed(s).
- Feeds will now fire both on submission AND on entry updates.
Configuration options: Select specific feeds to reprocess on update.
11. Admin Bar "Edit Forms" Menu
Jump from a form on your site straight to editing it. The WordPress admin bar gets an "Edit Forms" menu with every Gravity Forms form on the page.
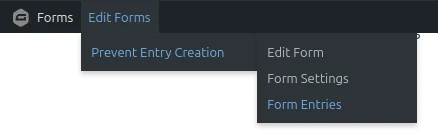
When you're looking at a page on the front end of your site, getting to its form in the admin takes a few clicks — and which form was it again? The Admin Bar "Edit Forms" Menu adds an "Edit Forms" menu to the WordPress admin bar that lists each Gravity Forms form on the page by its title, with links to Edit Form, Form Settings and Form Entries. A multi-page form is listed once.
Edit Form and Form Settings are shown to users who can edit forms, Form Entries to users who can view entries. A user with only one of these links gets it directly on the form title.
Where to find it: On the front end of your site, in the WordPress admin bar, when you're logged in.
How to use:
- While logged in, visit a page with a Gravity Forms form.
- Hover over "Edit Forms" in the admin bar.
- Hover over the form's title and click Edit Form, Form Settings or Form Entries.
Configuration options: None required. Works automatically.
12. Record Sent Notifications
See in an entry's notes which notifications were sent, and to whom. Answer "Did this entry's notification go out, and to whom?" in seconds.
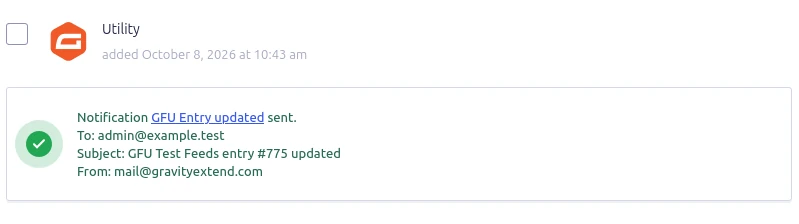
When someone asks whether they got the confirmation email, or a colleague wonders whether the notification for an entry went to the right address, you want to know without digging through mail logs. With Record Sent Notifications, every notification that is sent successfully adds a "Notification sent" note to the entry. The note shows the notification's name, linked to its settings, and the To, Subject, From and CC of the email. It looks like Gravity Forms' own notification notes.
BCC addresses are deliberately not shown: everyone who can view entry notes would see who got a blind copy.
Where to find it: In the Notes box of an entry's detail page (Forms → Entries, then open an entry).
How to use:
- Go to Forms → Entries and open an entry.
- Scroll to the Notes box.
- Each sent notification has a note with its name, To, Subject, From and (if set) CC. Click the name to open the notification's settings.
Configuration options: None required. Works automatically.
Switching Utilities On and Off
Every utility is on when you install GF Utility. If you don't need one, switch it off on the GF Utility settings page. It lists every utility with a switch and a short description that says where to find it.
A utility that is switched off is removed from Gravity Forms: its column, menu, setting or action is gone. Its form, field, notification and feed settings are kept, so when you switch it back on, everything is as you left it.
Where to find it: Forms → Settings → GF Utility. You need the Gravity Forms permission to edit settings.
How to use:
- Go to Forms → Settings and open the GF Utility tab.
- Switch off the utilities you don't use, or switch one back on.
- Click Save Settings.
Ready to Boost Your Gravity Forms Workflow?
Join agencies and developers who use GF Utility every day.
Get Plugin NowNeed Help?
If you're having trouble with any of the utilities, our support team is ready to assist.
Contact Support